1.nginx在服务器上安装
在Centos下,yum源不提供nginx的安装,可以通过切换yum源的方法获取安装。也可以通过直接下载安装包的方法,以下命令均需root权限执行.
首先安装必要的库(nginx 中gzip模块需要 zlib 库,rewrite模块需要 pcre 库,ssl 功能需要openssl库)。选定/usr/local为安装目录,以下具体版本号根据实际改变。
1.1 安装gcc gcc-c++(如新环境,未安装请先安装,已安装跳过,同下)
1 | $ yum install -y gcc gcc-c++ |
1.2 安装PCRE库
1 | $ cd /usr/local/ |
如报错:
configure: error: You need a C++ compiler for C++ support
解决:
1.3 安装SSL库
1 | $ cd /usr/local/ |
1.4 安装zlib库存
1 | $ cd /usr/local/ |
1.5 安装nginx
注意,此处根据个人想法是否修改nginx的安装路径。因为后期在添加nginx的jx.conf文件时是在nginx.conf中要配置的。默认情况下,配置文件nginx.conf放在/usr/local/nginx/conf, /etc/nginx或/usr/local/etc/nginx.
1 | $ cd /usr/local/ |
注: –with-http_ssl_module:这个不加后面在nginx.conf配置,ssl:on后,启动会报nginx: [emerg] unknown directive “ssl” in /opt/nginx/conf/nginx.conf 异常
1 | $ make && make install |
如果提示以下错误:
./configure: error: SSL modules require the OpenSSL library.
运行此命令:
报错:
./configure: error: the HTTP gzip module requires the zlib library
在–prefix后面接以下命令:
2
--with-zlib=/usr/local/zlib-1.2.8 指的是zlib-1.2.8 的源码路径。
以上安装方法nginx的配置文件位于/usr/local/nginx/conf/nginx.conf
Nginx配置文件常见结构的从外到内依次是「http」「server」「location」等等,缺省的继承关系是从外到内,也就是说内层块会自动获取外层块的值作为缺省值。
1.6 启动
根据上面的安装步骤,nginx 在服务器上安装后启动位置为:/usr/local/nginx/sbin/nginx,即直接运行该命令即可启动nginx。也可以修改指定配置文件地址,然后就可全局使用Nginx命令(个人理解)
1 | #寻找含有nginx的文件: |
nginx的配置文件目录/usr/local/nginx/conf/nginx.conf中在http内添加:
1 | server { |
1.6.1 启动前准备
启动前先看它启动没有,通过linux命令查看所有端口,看看启动端口中有没有80端口
1 | netstat -ntlp(查看端口情况) |
如果没有,则通过命令启动
1 | #启动: |
如果在启动时报错误(没报错跳过):
-bash: nginx: command not found
原因是没有将nginx配置到环境变量中(没报错跳过)
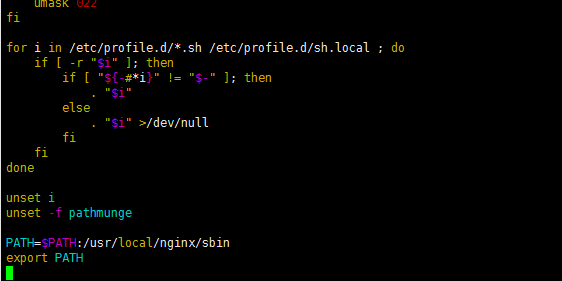
把nginx所在的目录加入系统变量中:
2
3
4
5
6
7
vim /etc/profile
在文件最后添加:
PATH=$PATH:/var/local/nginx/sbin
export PATH
2
3
4
5
source /etc/profile
#使配置文件生效,之后重启nginx
/usr/local/nginx/sbin/nginx (路径下启动,没有找到nginx命令时通过该命令启动)
1 | #设置nginx开启启动 |
然后在浏览器上访问:服务器的Ip(192.168.216.128):80
2.nginx安装启动后,宿主机无法访问nginx主页
具体情况如下
①本机能ping通虚拟机
②虚拟机也能ping通本机
③虚拟机能访问自己的web
④本机无法访问虚拟机的web
后来发现是防火墙将80端口屏蔽了的缘故。故检查是不是虚拟机的80端口被防火墙堵了,可以在宿主机通过命令:telnet 虚拟机Ip 80 来测试。如果能telnet通说明不是防火墙的问题,如果不能说明端口被堵住了。
解决方法如下:
1 | #Centos6的防火墙为iptables,而Centos7的防火墙为firewall,根据自己的系统做对应修改 |
3.nginx所需常用命令
查看nginx进程
1 | (lsof命令是一个列出当前系统打开文件的工具,详细百度) |
修改配置文件后,需要测试修改的配置文件是否合法,然后再重启nginx。
1 | #测试修改是否合法: |
开启端口:
1 | firewall-cmd --zone=public --add-port=80/tcp --permanent |
命令含义:
–zone #作用域
–add-port=80/tcp #添加端口,格式为:端口/通讯协议
–permanent #永久生效,没有此参数重启后将失效
1 | #重启防火墙 |
4. 解决Nginx出现403 forbidden (13: Permission denied)报错的四种方法
4.1 由于启动用户和nginx工作用户不一致所致
查看nginx的启动用户,发现是nobody,而未是用root启动的
1 | ps aux | grep "nginx: worker process" | awk'{print $1}' |
故将nginx.config的user改为和启动用户一致,
1 | vi /usr/local/nginx/conf/nginx.conf |
该文件如下:
1 | user nginx; #将nginx改为和启动用户一致 |
4.2 缺少index.html或者index.php文件,就是配置文件中index index.html index.htm这行中的指定的文件。
1 | server { |
如果在/data/www/下面没有index.php,index.html的时候,直接文件,会报403 forbidden。
4.3 权限问题,如果nginx没有web目录的操作权限,也会出现403错误。
解决办法:修改web目录的读写权限,或者是把nginx的启动用户改成目录的所属用户,重启Nginx即可解决
chmod 777 /etc/squid 运行命令后,squid文件夹(目录)的权限就被修改为777(可读可写可执行)。
1 | chmod -R 777 /data |
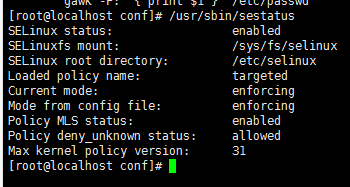
SELinux设置为开启状态(enabled)的原因。
4.4 查看当前selinux的状态。
1 | /usr/sbin/sestatus |

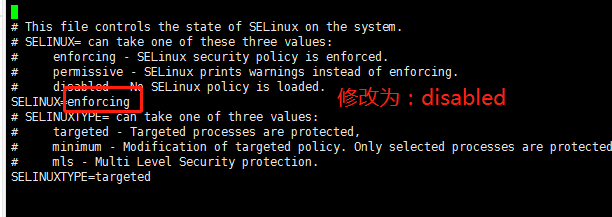
将SELINUX=enforcing 修改为 SELINUX=disabled 状态。
1 | vi /etc/selinux/config |

1 | SELINUX=disabled |
重启生效。reboot。
1 | reboot |
或者出现如下情况:
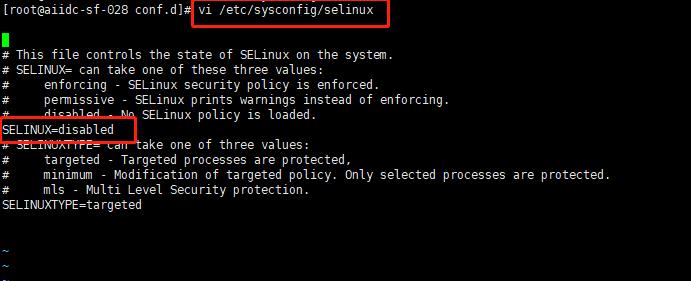
导致浏览器请求报502异常。同样修改上面的配置,但有可能修改的文件路径不一定相同,如果上面的文件路径不对,可试试下面的路径:
1 | vi /etc/sysconfig/selinux |
同时,在出现浏览器请求nginx报502的时候,可以在linux上通过curl命令排查是nginx出现问题还是对应的项目服务出现异常:
如:在浏览器上访问:http://172.16.16.153/dimension/api/swagger-ui.html 通过nginx代理去dimension服务,nginx配置如下:
1 | server { |
可通过curl来排查是否是dimension服务出现问题:
1 | [root@aiidc-sf-028 conf.d]# curl http://127.0.0.1:8601/ |
如果请求过去dimension服务没有返回相应的结果值,说明是服务出现问题;否则即是nginx没有将浏览器请求代理过去。
即可定位到问题出现在nginx上。
再通过修改系统配置:将SELINUX=enforcing 修改为 SELINUX=disabled 状态即解决问题。
