SpringBoot整合MyBatis多数据源

1.项目创建

  创建一个Spring Boot 项目工程,并且添加Mybatis、web以及相关数据源依赖(此处只选择了Mysql依赖):
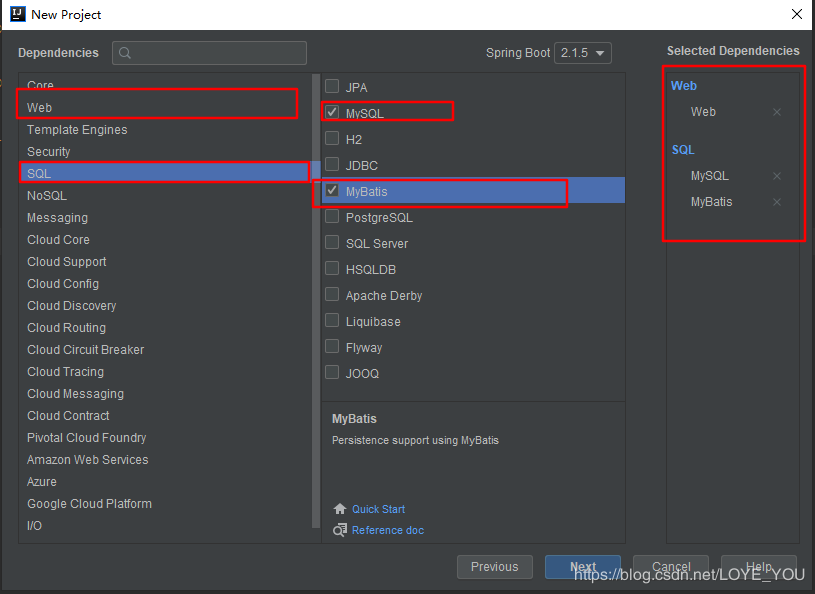
  或者在现有项目中,添加相关依赖,比如:mysql依赖以及postgresql依赖:

1
2
3
4
5
6
7
8
9
10
11
12
13
14
15
16
17
<dependency>
<groupId>org.postgresql</groupId>
<artifactId>postgresql</artifactId>
<version>42.2.6</version>
</dependency>

<!--连接mysql所需jar-->
<dependency>
<groupId>mysql</groupId>
<artifactId>mysql-connector-java</artifactId>
<scope>runtime</scope>
<version>5.1.47</version>
</dependency>
<dependency>
<groupId>org.springframework.boot</groupId>
<artifactId>spring-boot-starter-data-jpa</artifactId>
</dependency>

  然后添加数据库连接池Druid依赖,此处整合JdbcTemplate时也是要添加Druid依赖,但是要添加Spring Boot打造的Druid,不能使用传统的Druid。

1
2
3
4
5
6
7
8
9
10
11
12
13
14
15
16
17
18
19
20
21
22
<dependencies>
<dependency>
<groupId>org.springframework.boot</groupId>
<artifactId>spring-boot-starter-web</artifactId>
</dependency>
<dependency>
<groupId>org.mybatis.spring.boot</groupId>
<artifactId>mybatis-spring-boot-starter</artifactId>
<version>2.0.1</version>
</dependency>

<dependency>
<groupId>com.alibaba</groupId>
<artifactId>druid-spring-boot-starter</artifactId>
<version>1.1.16</version>
</dependency>
<dependency>
<groupId>org.springframework.boot</groupId>
<artifactId>spring-boot-starter-test</artifactId>
<scope>test</scope>
</dependency>
</dependencies>

2.双数据源配置

  设置双数据源配置,在项目中application.yml中配置数据库基本信息,然后提供两个DataSource即可。application.yml中的配置如下:

1
2
3
4
5
6
7
8
9
10
11
12
13
14
15
16
17
18
19
20
21
22
23
24
25
26
27
28
29
30
spring:
#主数据源,即默认的数据源,SpringBoot在启动时会加载默认数据源
datasource:
driver-class-name: org.postgresql.Driver
url: jdbc:postgresql://localhost:5432/yq_pgsql?useUnicode=true&characterEncoding=utf-8&useSSL=false
username: postgres
password: admin
#从数据源
mysqldatasource:
driver-class-name: com.mysql.jdbc.Driver
url: jdbc:mysql://localhost:3306/yq_mysql?serverTimezone=GMT%2B8&characterEncoding=utf-8&useSSL=false
username: root
password: admin
jpa:
properties.hibernate.hbm2ddl.auto: update
properties.hibernate.dialect: org.hibernate.dialect.MySQL5InnoDBDialect
show-sql: true
#设置mybatis扫描包路径
mybatis:
configuration:
map-underscore-to-camel-case: true
log-impl: org.apache.ibatis.logging.stdout.StdOutImpl
mapper-locations: classpath:mapper/*
mybatis-plus:
mapper-locations: classpath*:mapper/*
#设置日志显示配置,即显示sql查询语句与相关参数在控制台上
logging:
level:
com.example.qinyin.datasource.mysqlMapper : debug
com.example.qinyin.datasource.pgsqlMapper : debug

  之后创建两个DataSource的提供来源:

1
2
3
4
5
6
7
8
9
10
11
12
13
14
15
16
17
18
19
20
21
22
23
24
25
26
27
28
import com.alibaba.druid.spring.boot.autoconfigure.DruidDataSourceBuilder;
import org.springframework.boot.context.properties.ConfigurationProperties;
import org.springframework.context.annotation.Bean;
import org.springframework.context.annotation.Configuration;

import javax.sql.DataSource;

@Configuration
public class DataSourceConfig {

/**
* 设置数据源1
*/
@Bean
@ConfigurationProperties(prefix = "spring.datasource")
DataSource dataSource() {
return DruidDataSourceBuilder.create().build();
}

/**
* 设置数据源2
*/
@Bean
@ConfigurationProperties(prefix = "spring.mysqldatasource")
DataSource mysqlDataSource() {
return DruidDataSourceBuilder.create().build();
}
}

3.MyBatis配置

  对于Mybatis的配置,相对于JdbcTemplate的配置是有那么麻烦一点,因为要根据不同的数据源设置不同的SqlSessionFactory和SqlSessionTemplate这两个bean,故每个数据源都要单独配置。

3.1 配置第一个数据MyBatis配置:

1
2
3
4
5
6
7
8
9
10
11
12
13
14
15
16
17
18
19
20
21
22
23
24
25
26
27
28
29
30
31
32
33
34
35
36
37
38
39
40
41
42
43
44
45
46
47
48
49
50
51
52
53
54
55
56
57
58
59
60
61
62
63
64
65
66
67
68
import org.apache.ibatis.session.SqlSessionFactory;
import org.mybatis.spring.SqlSessionFactoryBean;
import org.mybatis.spring.SqlSessionTemplate;
import org.mybatis.spring.annotation.MapperScan;
import org.springframework.beans.factory.annotation.Value;
import org.springframework.context.annotation.Bean;
import org.springframework.context.annotation.Configuration;
import org.springframework.core.io.support.PathMatchingResourcePatternResolver;

import javax.sql.DataSource;
import javax.annotation.Resource;

/**
* 指明该类是一个配置类,配置类中要扫描的包是com.example.qinyin.datasource.pgsqlMapper,即该包下的Mapper接口将操作dataSource中的数据;
* 对应的SqlSessionFactory和SqlSessionTemplate分别是sqlSessionFactory()和sqlSessionTemplate()返回的bean,
* 在MyBatisConfigPgSql内部,分别对外提供SqlSessionFactory和SqlSessionTemplate两个bean即可,SqlSessionFactory根据dataSource创建,
* 然后再根据创建好的SqlSessionFactory创建一个SqlSessionTemplate。
*/
@Configuration
@MapperScan(basePackages = "com.example.qinyin.datasource.pgsqlMapper",
sqlSessionFactoryRef = "sqlSessionFactory",
sqlSessionTemplateRef = "sqlSessionTemplate")
public class MybatisConfigPgSql {

//注入DataSourceConfig中的数据源1指定的dataSource配置
@Resource(name = "dataSource")
DataSource dataSource;

@Value("${mybatis.mapper-locations}")
private String mapperLocations;

@Value("${mybatis.type-aliases-package}")
private String typeAliasesPackage;

@Bean
SqlSessionFactory sqlSessionFactory() {
SqlSessionFactory sessionFactory = null;
SqlSessionFactoryBean bean = new SqlSessionFactoryBean();
bean.setDataSource(dataSource);
try {
//这里需要设置扫描mapper的路径,否则容易导致mapper中的方法无法映射到xml中去,导致报:Invalid bound statement (not found) 错误
//当Mapper文件跟对应的Mapper接口处于同一位置的时候可以不用指定该属性的值。
PathMatchingResourcePatternResolver resolver = new PathMatchingResourcePatternResolver();
//通过读取配置文件中的值来指定扫描路径
bean.setMapperLocations(resolver.getResources(mapperLocations));
//直接写死值来指定扫描路径
//bean.setMapperLocations(new PathMatchingResourcePatternResolver().getResources("classpath:mapper/*.xml"));
// 设置typeAlias(别名) 包扫描路径。可配置可不配置(猜想:可能不同的数据源查询返回的实体类字段有差异,故指定不同的别名包来映射不同的查询结果)
// bean.setTypeAliasesPackage(typeAliasesPackage);

//开启驼峰式映射功能
org.apache.ibatis.session.Configuration configuration = new org.apache.ibatis.session.Configuration();
configuration.setMapUnderscoreToCamelCase(true);
configuration.setLogImpl(org.apache.ibatis.logging.stdout.StdOutImpl.class);
bean.setConfiguration(configuration);

sessionFactory = bean.getObject();
} catch (Exception e) {
e.printStackTrace();
}
return sessionFactory;
}

@Bean
SqlSessionTemplate sqlSessionTemplate() {
return new SqlSessionTemplate(sqlSessionFactory());
}
}

在定义SqlSessionFactoryBean的时候,dataSource属性是必须指定的,它表示用于连接数据库的数据源。当然,也可以指定一些其他的属性,下面简单列举几个:
(1)mapperLocations:它表示我们的Mapper文件存放的位置,当我们的Mapper文件跟对应的Mapper接口处于同一位置的时候可以不用指定该属性的值。
(2)configLocation:用于指定Mybatis的配置文件位置。如果指定了该属性,那么会以该配置文件的内容作为配置信息构建对应的SqlSessionFactoryBuilder,但是后续属性指定的内容会覆盖该配置文件里面指定的对应内容。
(3)typeAliasesPackage:它一般对应我们的实体类所在的包,这个时候会自动取对应包中不包括包名的简单类名作为包括包名的别名。多个package之间可以用逗号或者分号等来进行分隔。(value的值一定要是包的全名)
(4)typeAliases:数组类型,用来指定别名的。指定了这个属性后,Mybatis会把这个类型的短名称作为这个类型的别名,前提是该类上没有标注@Alias注解,否则将使用该注解对应的值作为此种类型的别名。(value的值一定要是类的完全限定名)

1
2
3
org.apache.ibatis.session.Configuration configuration = new org.apache.ibatis.session.Configuration();
configuration.setMapUnderscoreToCamelCase(true);
configuration.setLogImpl(org.apache.ibatis.logging.stdout.StdOutImpl.class);

设置驼峰式命名映射规则,在单数据源的时候,可以不用设置。SqlSessionFactoryBean会自动读取appliaction.yml配置文件中的参数(如下代码)来设置。但如果有多个数据源时,SqlSessionFactoryBean默认都会主数据源设置驼峰映射规则,而从数据源无法映射。故需要手动给从数据源设置(但建议每个数据源都设置上)。否则会导致某个数据源结果映射正常,但另一个数据源结果映射失败。

1
2
3
4
5
6
7
8
9
mybatis:
#扫描mapper包路径
mapper-locations: classpath:mapper/*
#别名包路径
type-aliases-package: com.example.druid.entity
configuration:
#是否开启驼峰式命名映射
map-underscore-to-camel-case: true
log-impl: org.apache.ibatis.logging.stdout.StdOutImpl

3.2 配置第二个数据MyBatis配置:

  与第一个数据源的配置方式类似,配置第二个数据源配置,只需要修改启动的相关mapper路径与DataSource来源即可:

1
2
3
4
5
6
7
8
9
10
11
12
13
14
15
16
17
18
19
20
21
22
23
24
25
26
27
28
29
30
31
32
33
34
35
36
37
38
39
40
41
42
43
44
45
46
47
48
49
50
51
52
53
54
55
56
57
58
59
60
61
import org.apache.ibatis.session.SqlSessionFactory;
import org.mybatis.spring.SqlSessionFactoryBean;
import org.mybatis.spring.SqlSessionTemplate;
import org.mybatis.spring.annotation.MapperScan;
import org.springframework.beans.factory.annotation.Value;
import org.springframework.context.annotation.Bean;
import org.springframework.context.annotation.Configuration;
import org.springframework.core.io.support.PathMatchingResourcePatternResolver;

import javax.annotation.Resource;
import javax.sql.DataSource;

@Configuration
@MapperScan(basePackages = "com.example.qinyin.datasource.mysqlMapper",
sqlSessionFactoryRef = "sqlSessionFactoryMySql",
sqlSessionTemplateRef = "sqlSessionTemplateMySql")
public class MybatisConfigMySql {

//注入DataSourceConfig中的数据源2指定的dataSource配置
@Resource(name = "mysqlDataSource")
DataSource mysqlDataSource;

@Value("${mybatis.mapper-locations}")
private String mapperLocations;

@Value("${mybatis.type-aliases-package}")
private String typeAliasesPackage;

@Bean
SqlSessionFactory sqlSessionFactoryMySql() {
SqlSessionFactory sessionFactory = null;
SqlSessionFactoryBean bean = new SqlSessionFactoryBean();
bean.setDataSource(mysqlDataSource);
try {
//这里需要设置扫描mapper的路径,否则容易导致mapper中的方法无法映射到xml中去,导致报:Invalid bound statement (not found) 错误
//当Mapper文件跟对应的Mapper接口处于同一位置的时候可以不用指定该属性的值。
PathMatchingResourcePatternResolver resolver = new PathMatchingResourcePatternResolver();
//通过读取配置文件中的值来指定扫描路径
bean.setMapperLocations(resolver.getResources(mapperLocations));
//直接写死值来指定扫描路径
// bean.setMapperLocations(new PathMatchingResourcePatternResolver().getResources("classpath:mapper/*.xml"));
// 设置typeAlias(别名) 包扫描路径。可配置可不配置(猜想:可能不同的数据源查询返回的实体类字段有差异,故指定不同的别名包来映射不同的查询结果)
// bean.setTypeAliasesPackage(typeAliasesPackage);

//开启驼峰式映射功能
org.apache.ibatis.session.Configuration configuration = new org.apache.ibatis.session.Configuration();
configuration.setMapUnderscoreToCamelCase(true);
configuration.setLogImpl(org.apache.ibatis.logging.stdout.StdOutImpl.class);
bean.setConfiguration(configuration);
sessionFactory = bean.getObject();
} catch (Exception e) {
e.printStackTrace();
}
return sessionFactory;
}

@Bean
SqlSessionTemplate sqlSessionTemplateMySql() {
return new SqlSessionTemplate(sqlSessionFactoryMySql());
}
}

4.实体类创建

4.1 创建数据源1 PostgreSql的表结构与相关实体类

数据库表创建并添加值:

1
2
3
4
5
6
7
8
9
10
11
12
13
CREATE TABLE "public"."yq_user" (
"id" int8 NOT NULL DEFAULT nextval('yq_user_id_seq'::regclass),
"name" varchar(255) COLLATE "pg_catalog"."default",
"account" varchar(255) COLLATE "pg_catalog"."default",
"password" varchar(255) COLLATE "pg_catalog"."default",
CONSTRAINT "yq_user_pkey" PRIMARY KEY ("id")
)
;

ALTER TABLE "public"."yq_user"
OWNER TO "postgres";

INSERT INTO "public"."yq_user"("id", "name", "account", "password") VALUES (1, '游强', 'yq', 'admin');

数据库内容:

id name account password
1 游强 yq admin

相关实体类User,service,mapper等自行创建。

4.2 创建数据源2 MySql的表结构与相关实体类

数据库表创建并添加值:

1
2
3
4
5
6
7
8
9
CREATE TABLE `yq_user` (
`id` int NOT NULL AUTO_INCREMENT,
`name` varchar(255) DEFAULT NULL,
`account` varchar(255) DEFAULT NULL,
`password` varchar(255) DEFAULT NULL,
PRIMARY KEY (`id`)
) ENGINE=InnoDB AUTO_INCREMENT=3 DEFAULT CHARSET=utf8mb4 COLLATE=utf8mb4_0900_ai_ci;

INSERT INTO `yq_mysql`.`yq_user`(`id`, `name`, `account`, `password`) VALUES (2, '秦音', 'qy', 'admin');

数据库内容:

id name account password
2 秦音 qy admin

相关实体类User,service,mapper等自行创建。
两个数据相关配置创建成功后,结构如下图:
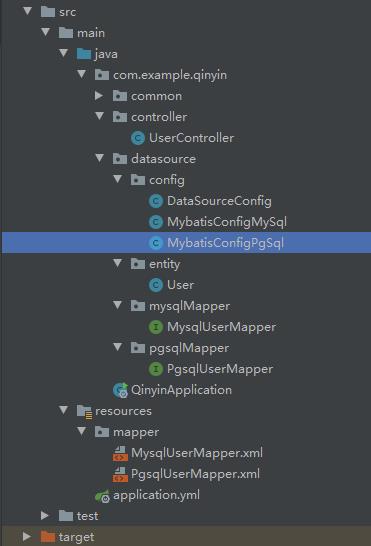
  本项目只是一个demo,故没有service层,且没有将两个数据源的实体类User没有区分开,都共用一个User(因为两个数据源的查询结构返回值都是一样的字段属性),用户可根据业务情况自行扩展。
当个数据源的mapper文件需要分开放置在不同的包下,因为在配置数据源时,会指定当前数据源去扫描那一个mapper,故需要将不同数据源的mapper文件放在不同的包下,但mapper对应的xml文件不受该限制。

5.测试效果

在同一个controller中引用两个不同数据源的mapper,来查询数据:

1
2
3
4
5
6
7
8
9
10
11
12
13
14
15
16
17
18
19
20
21
22
23
@Slf4j
@RestController()
@RequestMapping("/user")
@Api(description = "用户")
public class UserController {

//数据源1
@Autowired
private PgsqlUserMapper pgsqlUserMapper;

//数据源2
@Autowired
private MysqlUserMapper mysqlUserMapper;

@ApiOperation("获取用户")
@GetMapping("/getUser")
public List<User> receiveTask() {
User userpg = pgsqlUserMapper.getOne(1L);
User usermy = mysqlUserMapper.getOne(2L);
return Arrays.asList(userpg, usermy);
}

}

查询结果:

1
2
3
4
5
6
7
8
9
10
11
12
13
14
[
{
"id": 1,
"name": "游强",
"account": "yq",
"password": "admin"
},
{
"id": 2,
"name": "秦音",
"account": "qy",
"password": "admin"
}
]

6.遇到的问题

6.1 启动报错

org.apache.ibatis.binding.BindingException: Invalid bound statement (not found): com.example.qinyin.datasource.pgsqlMapper.getOne

即mapper中的接口方法没有找到其实现方法,即没有映射到xml文件中去。
原因:在启动的时候,Spring Boot默认把PgsqlUserMapper和MysqlUserMapper中的xml文件过滤掉了。
解决办法:
第一种:硬办法,将xml文件中的查询语句写在mapper文件中,采用@Sercelt(“”) 、@Insert(“”)等方法来操作;
第二种:让SpringBoot不过滤相关xml文件
在pom文件中build节点中添加如下配置:

1
2
3
4
5
6
7
8
9
10
11
12
13
14
15
16
17
18
19
20
<build>
<resources>
<resource>
<directory>src/main/java</directory>
<includes>
<include>**/*.yml</include>
<include>**/*.xml</include>
</includes>
<filtering>false</filtering>
</resource>
<resource>
<directory>src/main/resources</directory>
<includes>
<include>**/*.yml</include>
<include>**/*.xml</include>
</includes>
<filtering>false</filtering>
</resource>
</resources>
</build>

同时,在数据源配置类中(比如:MybatisConfigPgSql)创建sqlSessionFactory时,添加配置:

1
2
3
4
5
6
7
8
9
10
11
12
13
14
/**
* 这里需要设置扫描mapper的路径,否则容易导致mapper中的方法无法映射到xml中去,导致报:Invalid bound statement (not found) 错误
* 注意sqlSessionFactoryBean.setTypeAliasesPackage参数不支持通配符*,如果有多个包可以通过","等分割
* 如果需要加载依赖传递过来的jar包中的mapper目录下的xml,classpath:mapper/*.xml 修改为classpath*:mapper/*.xml
*/
//这里需要设置扫描mapper的路径,否则容易导致mapper中的方法无法映射到xml中去,导致报:Invalid bound statement (not found) 错误
//当Mapper文件跟对应的Mapper接口处于同一位置的时候可以不用指定该属性的值。
PathMatchingResourcePatternResolver resolver = new PathMatchingResourcePatternResolver();
//通过读取配置文件中的值来指定扫描路径
bean.setMapperLocations(resolver.getResources(mapperLocations));
//直接写死值来指定扫描路径
// bean.setMapperLocations(new PathMatchingResourcePatternResolver().getResources("classpath:mapper/*.xml"));
// 设置typeAlias(别名) 包扫描路径。可配置可不配置(猜想:可能不同的数据源查询返回的实体类字段有差异,故指定不同的别名包来映射不同的查询结果)
// bean.setTypeAliasesPackage(typeAliasesPackage);

然后把项目中的target删掉,重新启动。

6.2 项目启动时,数据库连接警告

Sun Aug 05 21:18:18 CST 2018 WARN: Establishing SSL connection without server’s identity verification is not recommended. According to MySQL 5.5.45+, 5.6.26+ and 5.7.6+ requirements SSL connection must be established by default if explicit option isn’t set. For compliance with existing applications not using SSL the verifyServerCertificate property is set to ‘false’. You need either to explicitly disable SSL by setting useSSL=false, or set useSSL=true and provide truststore for server certificate verification.

警告显示:不建议在没有服务器身份验证的情况下建立SSL连接,需要通过设置useSSL=false显式禁用SSL
解决办法:在application.yml文件的数据源url中添加useSSL=false

1
2
3
4
5
mysqldatasource:
driver-class-name: com.mysql.jdbc.Driver
url: jdbc:mysql://localhost:3306/yq_mysql?serverTimezone=GMT%2B8&characterEncoding=utf-8&useSSL=false
username: root
password: admin

出现下面的错误,在后面加上“?serverTimezone=GMT%2B8”(在数据库的连接url上设置),设置下时区即可。

参考链接:
Druid 多数据源支持.md